11 Temmuz 2012 Çarşamba
10 Temmuz 2012 Salı
9 Temmuz 2012 Pazartesi
tandoori chicken bites $7.48 recipe / $1.50 serving
To contact us Click HERE
tandoori chicken bites
A week or so ago, I got a wonderful email from a fellow New Orleanian (is that a word?) who said she had seen some yummy looking tandoori chicken nuggets at Whole Foods and she wondered if I could try my hand at making some. Well, I ran right out to that very same Whole Foods, bought the chicken nuggets to taste them, and set to work making my own.
I think I achieved a pretty close replica! Neither nuggets (store bought or my own) are breaded, but if you prefer a breaded nugget, the marinade would make an excellent base to adhere some bread crumbs too. I thought about it, but in the end didn't feel like breading would mix well with the tandoori flavor.
The tandoori spice mix that I used for this recipe was adapted from this recipe. Since most of the marinade is wiped off prior to baking, it wasn't at all spicy. I wanted mine spicy, so next time I think I'll sprinkle on a little bit more cayenne just before baking.
I baked the nuggets because that's just what you do with nuggets, but realized later that it would have been much faster and easier to just toss them onto my George Foreman grill. They'd be a little bit flatter on the grill, but SO much less time and effort.
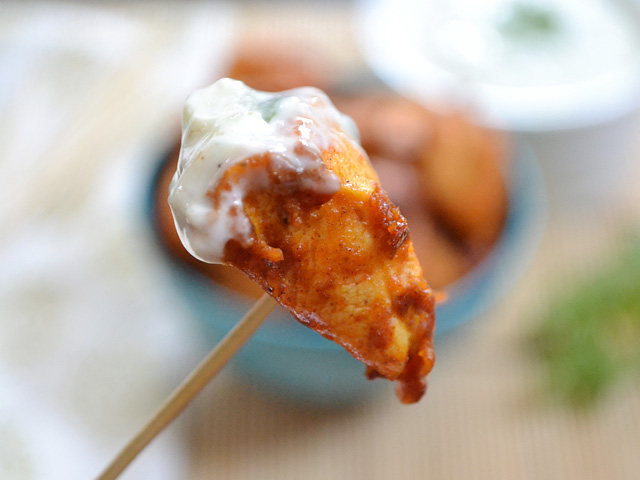
Oh, and in anticipation of these chicken bites being spicy (which they weren't), I made a cooling raita dipping sauce to go along side. That will be posted later today!


Total Recipe cost: $7.48
Servings Per Recipe: 5 (about 8 pieces each)
Cost per serving: $1.50
Prep time: 15 min. Marinate time: 2-24 hrs. Cook time: 30 min. Total: 2 hrs. 45 min.
If you are sensitive to spicy foods, you can leave out the cayenne or start with 1/4 tsp.
STEP 1: Cut the chicken breasts into small chunks. I cut each breast into 3-4 strips lengthwise, and then each strip into 4-5 chunks to yield approximately 40 pieces. Place the chicken pieces in a large zip top bag.
STEP 2: Add to the rest of the ingredients to the bag (yogurt, minced garlic, grated ginger, lemon juice, salt, coriander, cumin, turmeric, cayenne, garam masala, and 1/2 Tbsp of the paprika). Close the bag tightly and smoosh it around to mix the ingredients. Place the bag in the refrigerator for 2 to 24 hours to marinate.
STEP 3: Preheat the oven to 425 degrees. Cover a baking sheet with foil and spray with non-stick spray. Wipe the marinade from the chicken pieces and place them in a bowl. Sprinkle the last tablespoon of paprika and a pinch more of salt over the chicken pieces (add more cayenne if hot chicken pieces are desired). Toss to coat. The extra paprika here just helps the red color, you can skip it if desired. A little extra salt definitely helps, though.
STEP 4: Place the chicken pieces on the prepared baking sheet, spaced out so they do not touch. Bake for 15 minutes in the fully preheated oven. Take the sheet out, turn each piece of chicken over, and bake for an additional 15 minutes. Serve warm.

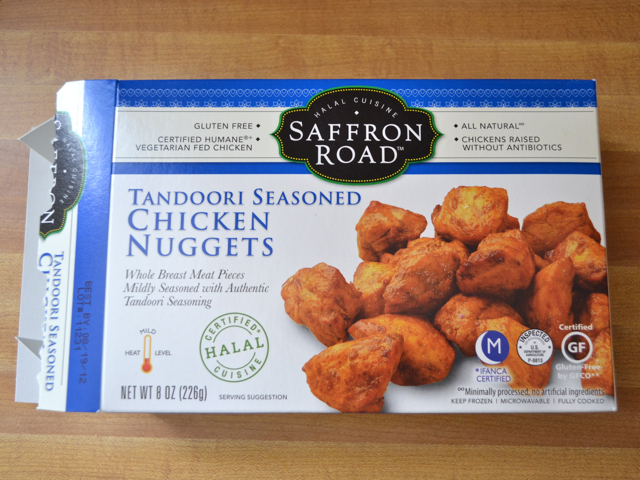
These are the store bought chicken nuggets. Pretty delish, but also pretty pricy. $5.99 for 2.5 servings of about 6 pieces each. Ouch.
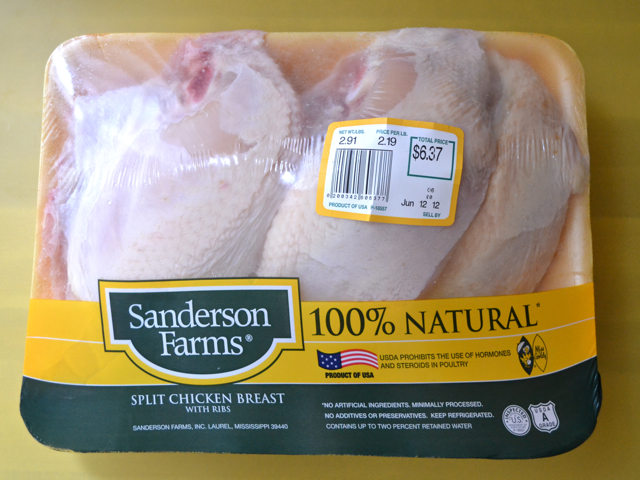
It was slim pickins' for chicken at the store this time around, so I saved some money by purchasing skin on, bone attached chicken breasts. Sure, part of the reason that it's less expensive is because of the bone and skin, but with skinless/boneless chicken you are also paying a hefty fee for convenience. The skinless boneless breasts were *twice* the price per pound. Removing the skin is easy, it practically peels right off. The rib bones can be removed by just sliding a knife between the breast and bone. It may take a minute to figure it out if you've never done it, but it's not nearly as confusing as say, deboning a pork shoulder.
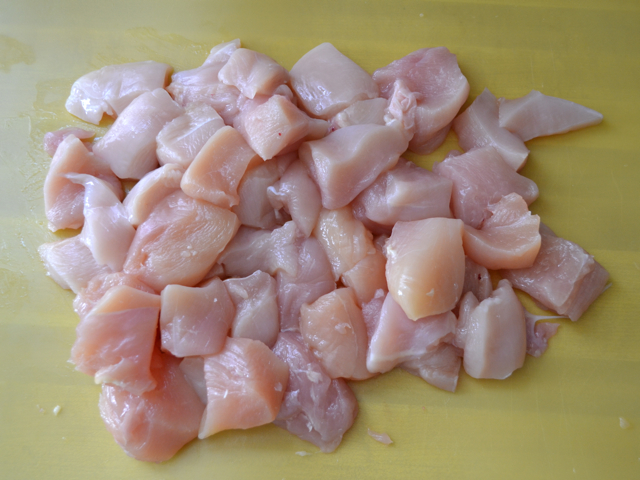
Cut the chicken into small chunks. I got about 40 chunks out of mine. I first cut each breast into 3-4 strips lengthwise (depending on how big the breast was) and then cut each strip into 4-5 chunks.
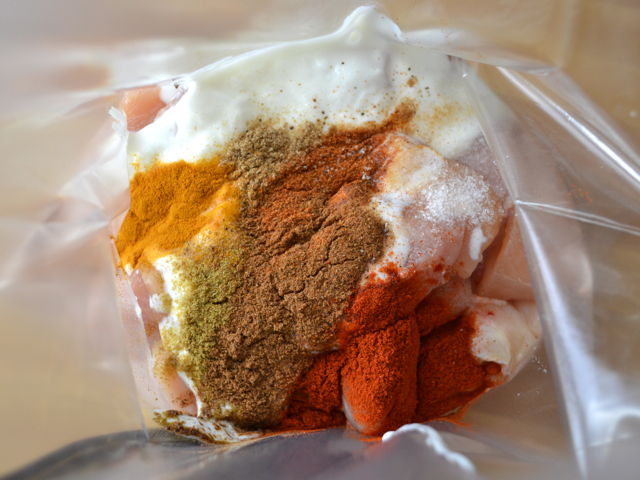
Add the chicken chunks to a zip top bag and then add the yogurt, lemon juice, coriander, cumin, turmeric, cayenne, garam masala, salt, and 1/2 Tbsp of the paprika (I use the other tablespoon of paprika later).
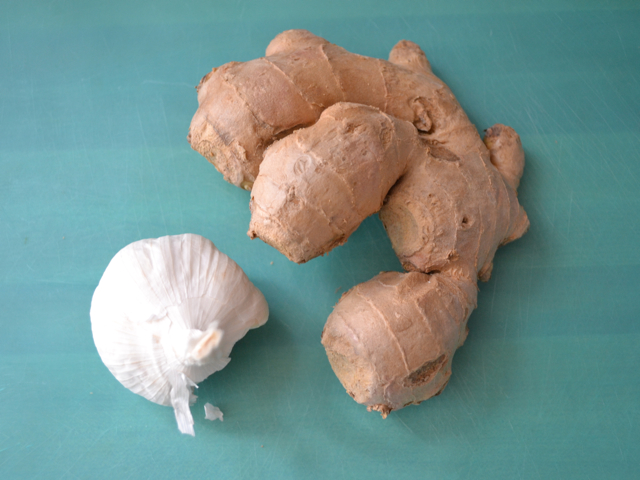
Mince two cloves of garlic and add it to the bag. Peel and grate about one inch of fresh ginger into the bag.

Close up the bag, removing as much air as possible. Smoosh the bag all around to mix up the ingredients. Place the bag in the refrigerator and allow it to marinate for 2 hours to over night.
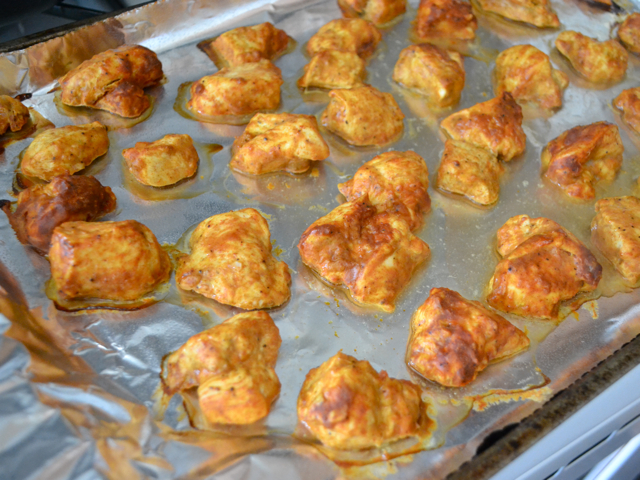
When you're ready to make the chicken bites, preheat the oven to 425 degrees. Cover a baking sheet with foil and spray it with non-stick spray. Take each piece of chicken out of the marinade and wipe off the excess (I forgot to get a picture of this part...). Place them in a bowl and sprinkle on the last tablespoon of paprika and a pinch more of salt (and cayenne if you want it spicy). Place the chicken pieces on the baking sheet so that they are not touching. Bake for 15 minutes and then take them out and flip them over. This picture is after the first 15 minutes of baking.
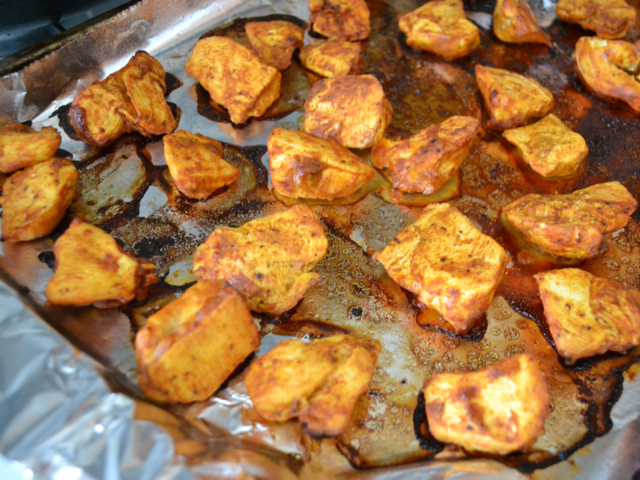
Place the chicken back in the oven and bake for another 15 minutes. The liquid that comes off of the chicken as it bakes may look burned on the baking sheet, but the chicken itself will not be.

I served mine with some fresh naan, a yogurt dipping sauce (raita), and I plan to make some creamed spinach as well.
Stay tuned for the raita dipping sauce recipe later today!!
tandoori chicken bites $7.48 recipe / $1.50 serving
A week or so ago, I got a wonderful email from a fellow New Orleanian (is that a word?) who said she had seen some yummy looking tandoori chicken nuggets at Whole Foods and she wondered if I could try my hand at making some. Well, I ran right out to that very same Whole Foods, bought the chicken nuggets to taste them, and set to work making my own.I think I achieved a pretty close replica! Neither nuggets (store bought or my own) are breaded, but if you prefer a breaded nugget, the marinade would make an excellent base to adhere some bread crumbs too. I thought about it, but in the end didn't feel like breading would mix well with the tandoori flavor.
The tandoori spice mix that I used for this recipe was adapted from this recipe. Since most of the marinade is wiped off prior to baking, it wasn't at all spicy. I wanted mine spicy, so next time I think I'll sprinkle on a little bit more cayenne just before baking.
I baked the nuggets because that's just what you do with nuggets, but realized later that it would have been much faster and easier to just toss them onto my George Foreman grill. They'd be a little bit flatter on the grill, but SO much less time and effort.
Oh, and in anticipation of these chicken bites being spicy (which they weren't), I made a cooling raita dipping sauce to go along side. That will be posted later today!
Tandoori Chicken Bites
Total Recipe cost: $7.48
Servings Per Recipe: 5 (about 8 pieces each)
Cost per serving: $1.50
Prep time: 15 min. Marinate time: 2-24 hrs. Cook time: 30 min. Total: 2 hrs. 45 min.
| INGREDIENTS | COST | |
| 3 large | chicken breasts | $6.37 |
| 1/2 cup | plain yogurt | $0.27 |
| 1 Tbsp | lemon juice | $0.05 |
| 2 cloves | garlic | $0.16 |
| 1 inch | fresh ginger | $0.18 |
| 1/2 tsp | salt | $0.02 |
| 1/2 tsp | coriander | $0.03 |
| 1/2 tsp | cumin | $0.03 |
| 1/2 tsp | turmeric | $0.03 |
| 1/2 tsp | cayenne pepper | $0.03 |
| 1/2 Tbsp | garam masala | $0.08 |
| 1.5 Tbsp | paprika, divided | $0.23 |
| TOTAL | $7.48 | |
STEP 1: Cut the chicken breasts into small chunks. I cut each breast into 3-4 strips lengthwise, and then each strip into 4-5 chunks to yield approximately 40 pieces. Place the chicken pieces in a large zip top bag.
STEP 2: Add to the rest of the ingredients to the bag (yogurt, minced garlic, grated ginger, lemon juice, salt, coriander, cumin, turmeric, cayenne, garam masala, and 1/2 Tbsp of the paprika). Close the bag tightly and smoosh it around to mix the ingredients. Place the bag in the refrigerator for 2 to 24 hours to marinate.
STEP 3: Preheat the oven to 425 degrees. Cover a baking sheet with foil and spray with non-stick spray. Wipe the marinade from the chicken pieces and place them in a bowl. Sprinkle the last tablespoon of paprika and a pinch more of salt over the chicken pieces (add more cayenne if hot chicken pieces are desired). Toss to coat. The extra paprika here just helps the red color, you can skip it if desired. A little extra salt definitely helps, though.
STEP 4: Place the chicken pieces on the prepared baking sheet, spaced out so they do not touch. Bake for 15 minutes in the fully preheated oven. Take the sheet out, turn each piece of chicken over, and bake for an additional 15 minutes. Serve warm.
Step By Step Photos
These are the store bought chicken nuggets. Pretty delish, but also pretty pricy. $5.99 for 2.5 servings of about 6 pieces each. Ouch.
It was slim pickins' for chicken at the store this time around, so I saved some money by purchasing skin on, bone attached chicken breasts. Sure, part of the reason that it's less expensive is because of the bone and skin, but with skinless/boneless chicken you are also paying a hefty fee for convenience. The skinless boneless breasts were *twice* the price per pound. Removing the skin is easy, it practically peels right off. The rib bones can be removed by just sliding a knife between the breast and bone. It may take a minute to figure it out if you've never done it, but it's not nearly as confusing as say, deboning a pork shoulder.
Cut the chicken into small chunks. I got about 40 chunks out of mine. I first cut each breast into 3-4 strips lengthwise (depending on how big the breast was) and then cut each strip into 4-5 chunks.
Add the chicken chunks to a zip top bag and then add the yogurt, lemon juice, coriander, cumin, turmeric, cayenne, garam masala, salt, and 1/2 Tbsp of the paprika (I use the other tablespoon of paprika later).
Mince two cloves of garlic and add it to the bag. Peel and grate about one inch of fresh ginger into the bag.
Close up the bag, removing as much air as possible. Smoosh the bag all around to mix up the ingredients. Place the bag in the refrigerator and allow it to marinate for 2 hours to over night.
When you're ready to make the chicken bites, preheat the oven to 425 degrees. Cover a baking sheet with foil and spray it with non-stick spray. Take each piece of chicken out of the marinade and wipe off the excess (I forgot to get a picture of this part...). Place them in a bowl and sprinkle on the last tablespoon of paprika and a pinch more of salt (and cayenne if you want it spicy). Place the chicken pieces on the baking sheet so that they are not touching. Bake for 15 minutes and then take them out and flip them over. This picture is after the first 15 minutes of baking.
Place the chicken back in the oven and bake for another 15 minutes. The liquid that comes off of the chicken as it bakes may look burned on the baking sheet, but the chicken itself will not be.
I served mine with some fresh naan, a yogurt dipping sauce (raita), and I plan to make some creamed spinach as well.
Stay tuned for the raita dipping sauce recipe later today!!
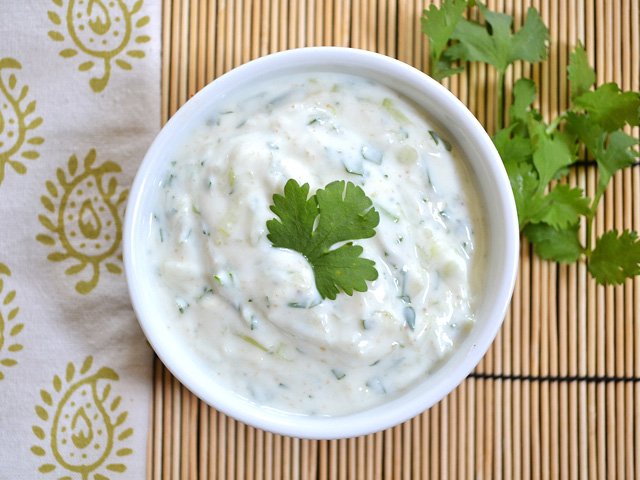
cucumber raita $1.20 recipe / $0.20 serving
To contact us Click HERE
cucumber raita
I had an email from a reader (sorry, can't find the email to fetch your name!) a while back requesting that I try to make a raita similar to the one she had at Trader Joe's. Unfortunately, I've never had raita and there isn't a Trader Joe's near by where I could get some to try. I looked into the recipe anyway and was intrigued. Raita kind of looks like the Indian version of tzatziki... and I LOVE tzatziki.
So, if you're unfamiliar, both are a yogurt based sauce used for dipping, putting on flat breads, or whatever else you'd like. They're creamy, cooling, and tangy. I looked up some recipes for raita and found that there are a million different versions out there. Some with cucumber, some with ginger, some with green onions, some simply with yogurt and a couple of spices . I liked the idea of having both cucumber and ginger to make it extra "cool" on the palate, so I went with that. You can definitely experiment with this and make it your own.
Full fat, strained (or Greek) yogurt is best for this recipe because it makes a nice thick, rich sauce. I happened to have some non-fat regular (not Greek) yogurt in my fridge so I used it instead of buying more. It was still delicious, although much thinner. It was still flavorful and went great with my Tandoori Chicken Bites. I also like the idea of adding a pinch of cayenne to juxtapose the cool cucumber and ginger... I might go add some now :)
Total Recipe cost: $1.20
Servings Per Recipe: 6 (1/4 cup each)
Cost per serving: $0.20
Prep time: 15 min. Cook time: 0 min. Total: 15 min.
STEP 1: Peel the cucmber and slice in half lengthwise. Use a spoon to scoop out the seeds. Grate the cucumber on a large cheese grater and place into a colander. Add a pinch of salt and allow it to sit while you prepare the rest of the sauce.
STEP 2: In a small bowl, combine the yogurt, salt, cumin, and coriander. Stir to combine. Roughly chop the cilantro and add to the bowl. Peel the ginger and grate it (using a fine cheese grater) into the bowl.
STEP 3: After the cucumber has been sitting for at least ten minutes, press it into the sides of the colander to extract as much moisture as possible. Add it to the sauce and stir to combine. Serve the sauce immediately or refrigerate to allow the flavors to combine. Adjust salt as needed.
This sauce should keep in the refrigerator for approximately 5 days.
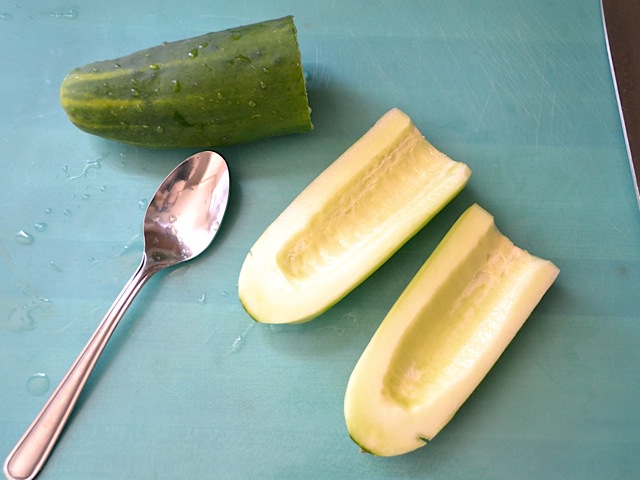
Begin with the cucumber. Peel the half that you'll be using, slice it in half lengthwise, and then scrape out the seeds with a spoon.

Grate the cucumber into a colander using a cheese grater. Add a pinch of salt and allow it to sit. The salt will help draw out the juices so that they don't make your sauce watery.
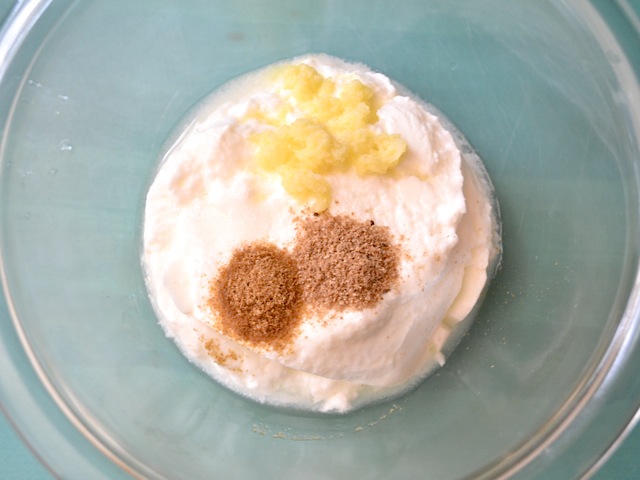
Place the yogurt in a bowl and add the cumin, coriander, and salt. Peel the ginger and grate it into the bowl as well. Stir to combine
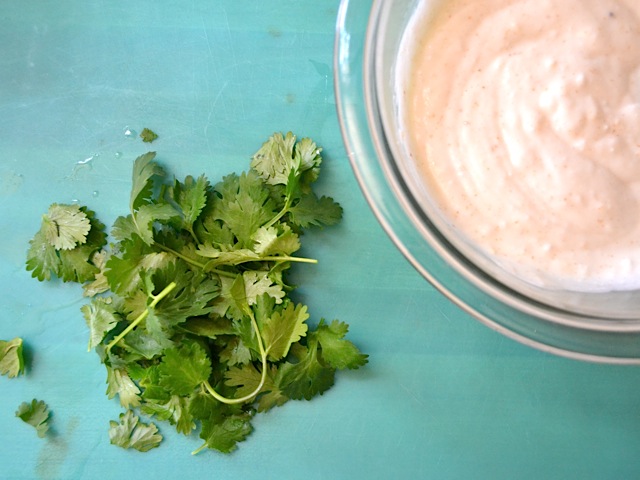
Take a handful of cilantro (or mint) leaves and roughly chop them.
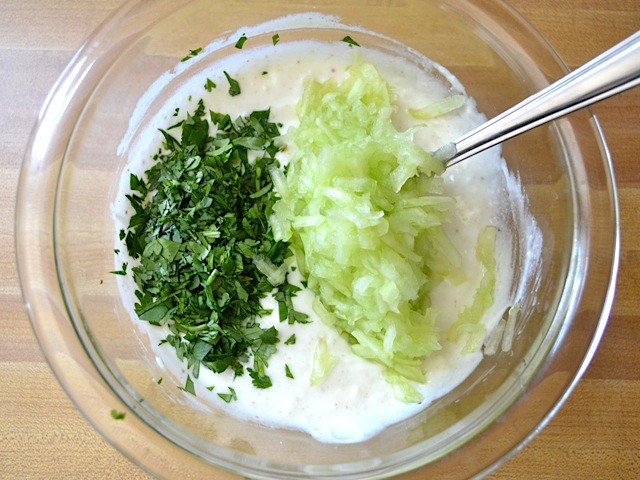
After the cucumber has been sitting in the colander for about ten minutes, press it against the sides to extract as much water as possible. Add it to the yogurt sauce along with the chopped cilantro. Stir to combine.
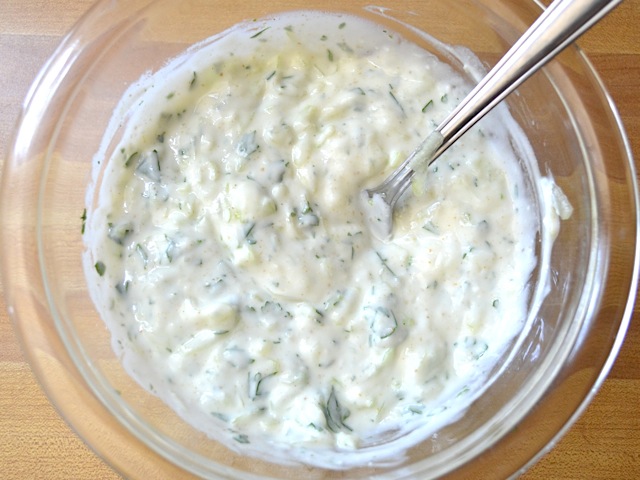
Taste the sauce and add more salt if desired. I didn't want a lot of salt in this sauce because I liked it's light, fresh flavor. You can eat the sauce as is or refrigerate it to allow the flavors to mingle. Isn't it pretty?
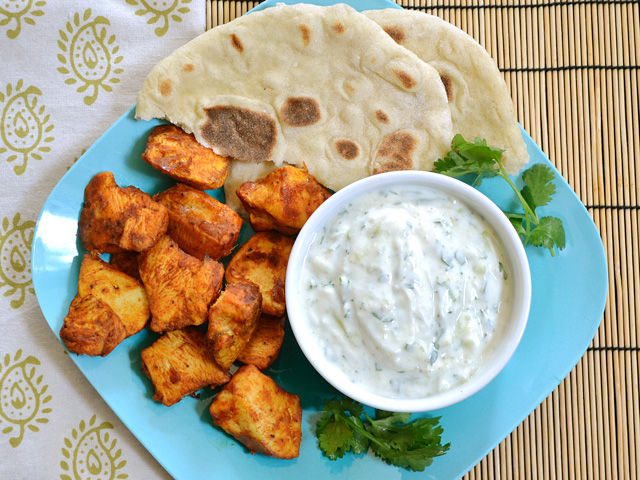
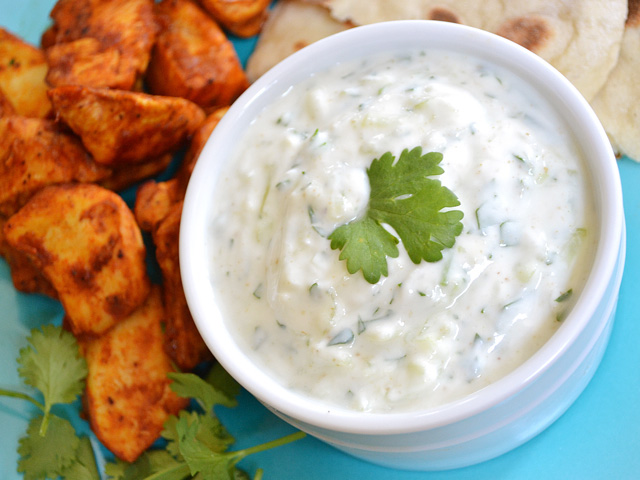
I served this as a dipping sauce for the tandoori chicken bites, but I also ended up making flatbread sandwiches with the naan, raita, tandoori chicken, leftover fresh cilantro, and a little chili garlic sauce. They were TO DIE FOR. Like little Indian tacos or shwarma wraps!
cucumber raita $1.20 recipe / $0.20 serving
I had an email from a reader (sorry, can't find the email to fetch your name!) a while back requesting that I try to make a raita similar to the one she had at Trader Joe's. Unfortunately, I've never had raita and there isn't a Trader Joe's near by where I could get some to try. I looked into the recipe anyway and was intrigued. Raita kind of looks like the Indian version of tzatziki... and I LOVE tzatziki.So, if you're unfamiliar, both are a yogurt based sauce used for dipping, putting on flat breads, or whatever else you'd like. They're creamy, cooling, and tangy. I looked up some recipes for raita and found that there are a million different versions out there. Some with cucumber, some with ginger, some with green onions, some simply with yogurt and a couple of spices . I liked the idea of having both cucumber and ginger to make it extra "cool" on the palate, so I went with that. You can definitely experiment with this and make it your own.
Full fat, strained (or Greek) yogurt is best for this recipe because it makes a nice thick, rich sauce. I happened to have some non-fat regular (not Greek) yogurt in my fridge so I used it instead of buying more. It was still delicious, although much thinner. It was still flavorful and went great with my Tandoori Chicken Bites. I also like the idea of adding a pinch of cayenne to juxtapose the cool cucumber and ginger... I might go add some now :)
Cucumber Raita
Total Recipe cost: $1.20
Servings Per Recipe: 6 (1/4 cup each)
Cost per serving: $0.20
Prep time: 15 min. Cook time: 0 min. Total: 15 min.
| INGREDIENTS | COST | |
| 1 cup | plain yogurt | $0.54 |
| 1/2 medium | cucumber | $0.30 |
| 1/2 inch | fresh ginger | $0.09 |
| 1/4 tsp | coriander | $0.02 |
| 1/4 tsp | cumin | $0.02 |
| 1/4 tsp | salt | $0.02 |
| handful | fresh cilantro or mint | $0.21 |
| TOTAL | $1.20 | |
STEP 1: Peel the cucmber and slice in half lengthwise. Use a spoon to scoop out the seeds. Grate the cucumber on a large cheese grater and place into a colander. Add a pinch of salt and allow it to sit while you prepare the rest of the sauce.
STEP 2: In a small bowl, combine the yogurt, salt, cumin, and coriander. Stir to combine. Roughly chop the cilantro and add to the bowl. Peel the ginger and grate it (using a fine cheese grater) into the bowl.
STEP 3: After the cucumber has been sitting for at least ten minutes, press it into the sides of the colander to extract as much moisture as possible. Add it to the sauce and stir to combine. Serve the sauce immediately or refrigerate to allow the flavors to combine. Adjust salt as needed.
This sauce should keep in the refrigerator for approximately 5 days.
Step By Step Photos
Begin with the cucumber. Peel the half that you'll be using, slice it in half lengthwise, and then scrape out the seeds with a spoon.
Grate the cucumber into a colander using a cheese grater. Add a pinch of salt and allow it to sit. The salt will help draw out the juices so that they don't make your sauce watery.
Place the yogurt in a bowl and add the cumin, coriander, and salt. Peel the ginger and grate it into the bowl as well. Stir to combine
Take a handful of cilantro (or mint) leaves and roughly chop them.
After the cucumber has been sitting in the colander for about ten minutes, press it against the sides to extract as much water as possible. Add it to the yogurt sauce along with the chopped cilantro. Stir to combine.
Taste the sauce and add more salt if desired. I didn't want a lot of salt in this sauce because I liked it's light, fresh flavor. You can eat the sauce as is or refrigerate it to allow the flavors to mingle. Isn't it pretty?
I served this as a dipping sauce for the tandoori chicken bites, but I also ended up making flatbread sandwiches with the naan, raita, tandoori chicken, leftover fresh cilantro, and a little chili garlic sauce. They were TO DIE FOR. Like little Indian tacos or shwarma wraps!
thai turkey meatloaf $7.83 recipe / $0.98 serving
To contact us Click HERE
thai turkey meatloaf
Meatloaf isn't pretty. Let's just get that out on the table. It's so ugly, in fact, that I couldn't stop giggling while taking these pictures. All I could think about were those silly post cards with retro pictures of jello molds and other hideous foods from the 1950s. But you know what? After one bite you forget allll about what it looks like. Even the smell is enough to change your mind. This loaf is insane (in a good way).
If you're not into loaves of meat, I found that this mix makes a pretty excellent Thai turkey burger as well. To taste test the seasoning I had to cook a small dollop in a skillet and it turned into a little mini turkey burger. Quite delicious. Pop one of those onto a Hawaiian roll and you're golden. Or, you can do it in meatball form.
I covered my mouth-wateringly delicious (yet ugly) meatloaf with a spicy Sriracha glaze. If you don't like spicy, you can use a jar of sweet chili sauce (not spicy as the name may imply) or even a sweet and sour sauce. But, you know, I had to have my sriracha!
Oh, and this makes a pretty big loaf. It can easily be halved if needed.
Total Recipe cost: $7.83
Servings Per Recipe: 8
Cost per serving: $0.98
Prep time: 20 min. Cook time: 60-75 min. Total: 1 hr. 35 min.
STEP 1: Place the ground turkey in a large bowl. Slice the green onions and mince the garlic. Add the onion and garlic to the bowl along with the soy sauce and sesame oil. Peel the ginger and grate it directly into the bowl using a fine cheese grater. Mix everything together well.
STEP 2: Add the eggs and cooked jasmine rice (white rice will work in a pinch). Mix everything together thoroughly. Line a baking sheet with foil and spray with non-stick spray. Place the meat mixture onto the baking sheet and shape it into a loaf.
STEP 3: Preheat the oven to 375 degrees. Once preheated, place the loaf inside and bake for 30 minutes. While the loaf is baking, mix together the sriracha glaze. In a small bowl stir together the brown sugar, ketchup, sriracha, and rice vinegar.
STEP 4: After it has baked 30 minutes, remove the loaf from the oven and spoon half of the sriracha glaze over top. Bake for an additional 30 minutes. Spoon the remaining glaze over top and bake for a final 15 minutes. A meat thermometer placed in the center of the loaf should read 160 degrees Fahrenheit.
STEP 5: Allow the loaf to rest for ten minutes before slicing.
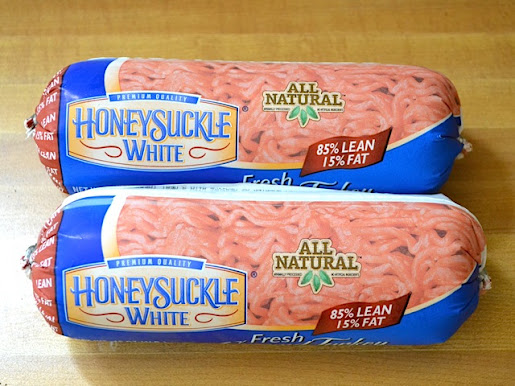
This is the ground turkey that I used. It is 85% lean, 15% fat. The store did have a leaner ground turkey but it was about a dollar more per pound and I figured the fat would help keep the loaf moist. If you prefer the leaner turkey, it should also work just fine.
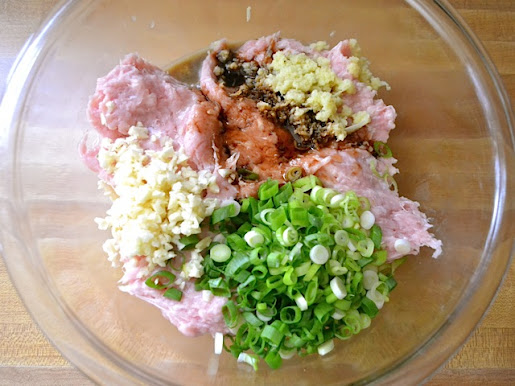
Place the ground turkey in a bowl and add the sliced green onions, minced garlic, peeled and grated ginger, soy sauce, and sesame oil. Mix it all up very well.

Next add two eggs and the cooked jasmine rice. White or brown rice will work in a pinch if you don't have jasmine rice, but just know that jasmine rice does add some flavor. Mix everything up really well again.
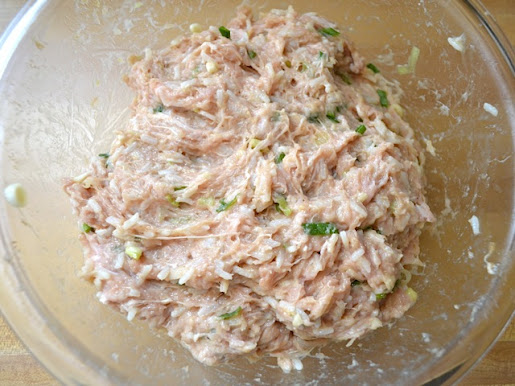
And this is your final Thai turkey mix. You can make it into burgers or meatballs at this point if you don't want a loaf. It's pretty wet and sticky, so if you're making burgers, make sure to use some oil or non-stick spray.
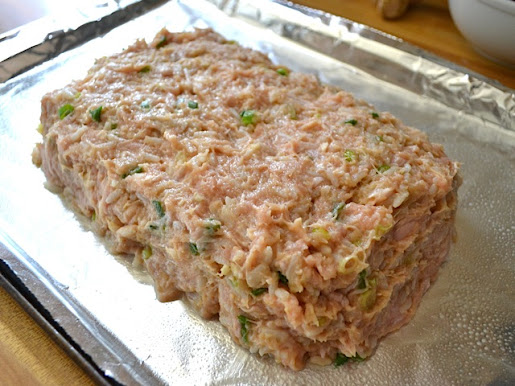
If you're going the meatloaf route, cover a baking sheet with foil and then spray with non-stick spray. Shape the mixture into a loaf. I prefer to bake meatloaf on a baking sheet rather than a loaf pan because it allows extra moisture to drain away. Loaf pans hold it all in and they often get soupy on the bottom.
Bake the loaf in a 375 degree oven for 30 minutes. This is what it looks like so far. Not so pretty, but you can see how some of that moisture is draining away.
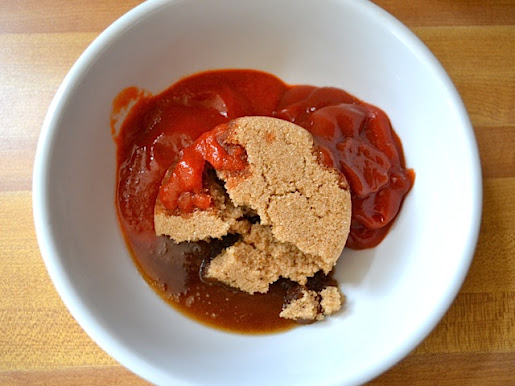
While the loaf is baking during that first 30 minutes, mix up the sriracha glaze. Stir together the brown sugar, ketchup, sriracha, and rice vinegar.
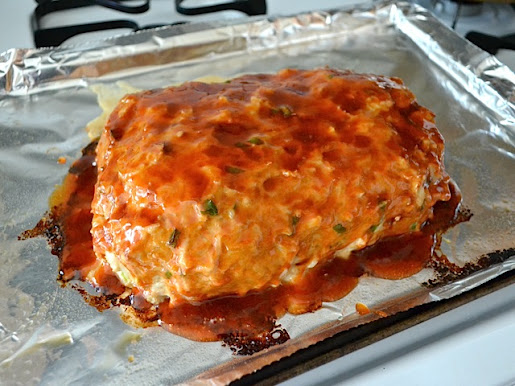
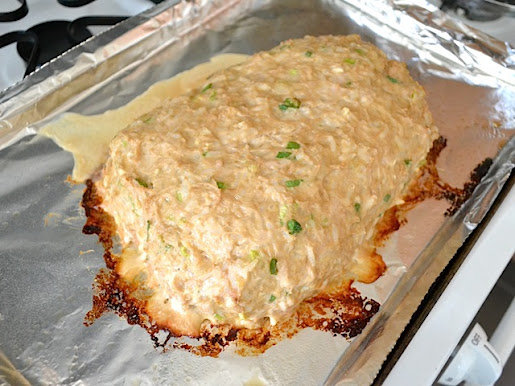
Spoon about half of the glaze over the meat loaf and spread it all over the sides. Bake for an additional 30 minutes.
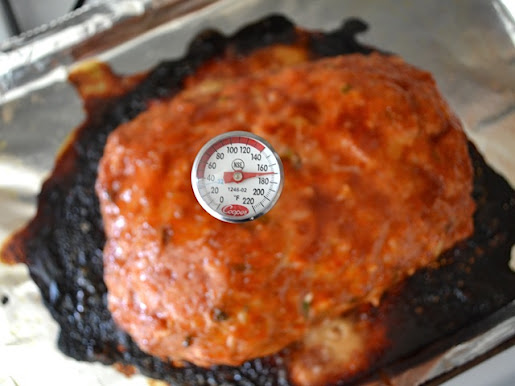
After a full 60 minutes of baking, my meatloaf had already exceeded the safety mark of 160 degrees internal temperature. I still had some glaze left so I spooned it over top and baked it for 15 more minutes.
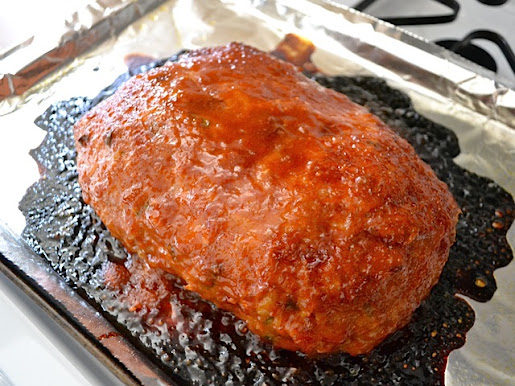
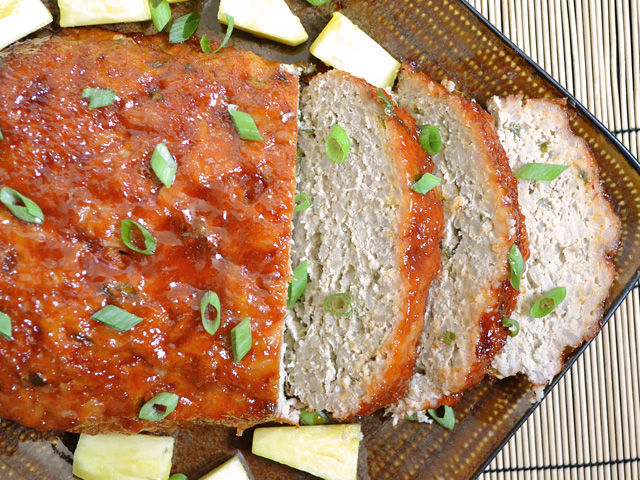
And then it had a nice thick, sticky sriracha glaze! ...smells SO good. The meatloaf should lift easily from the baking sheet. The glaze that dripped onto the baking sheet was burned, but none of the meatloaf or glaze on the meatloaf were even close to being burned.
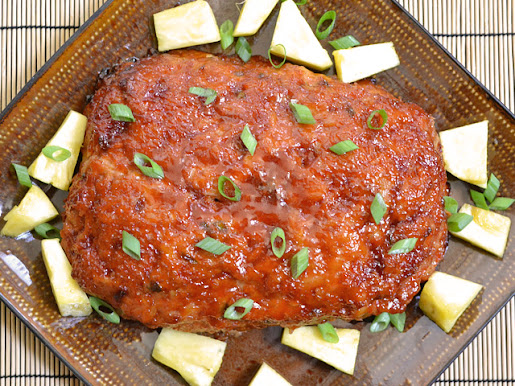
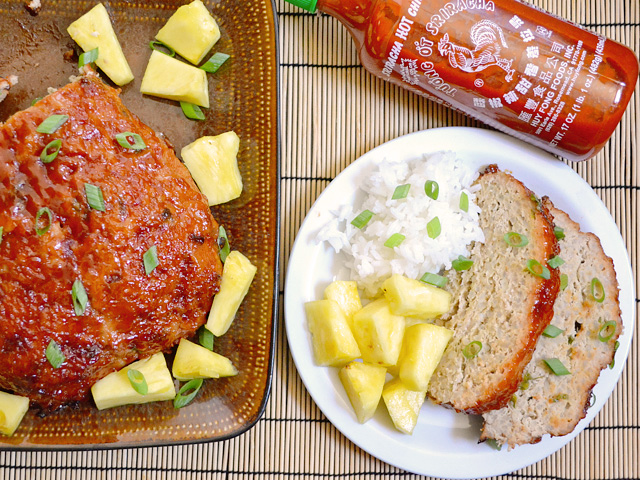
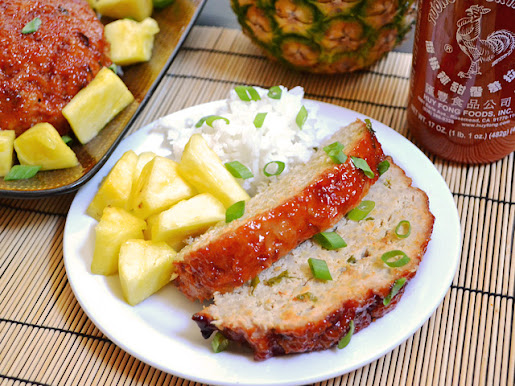
I garnished with a few more sliced green onions and I just happened to have some fresh pineapple that I cut up that morning.
Make sure to allow the meatloaf to rest for at least ten minutes before slicing. This allows the steam pressure to reduce, which keeps the moisture in the loaf instead of driving it out.
thai turkey meatloaf $7.83 recipe / $0.98 serving
Meatloaf isn't pretty. Let's just get that out on the table. It's so ugly, in fact, that I couldn't stop giggling while taking these pictures. All I could think about were those silly post cards with retro pictures of jello molds and other hideous foods from the 1950s. But you know what? After one bite you forget allll about what it looks like. Even the smell is enough to change your mind. This loaf is insane (in a good way).If you're not into loaves of meat, I found that this mix makes a pretty excellent Thai turkey burger as well. To taste test the seasoning I had to cook a small dollop in a skillet and it turned into a little mini turkey burger. Quite delicious. Pop one of those onto a Hawaiian roll and you're golden. Or, you can do it in meatball form.
I covered my mouth-wateringly delicious (yet ugly) meatloaf with a spicy Sriracha glaze. If you don't like spicy, you can use a jar of sweet chili sauce (not spicy as the name may imply) or even a sweet and sour sauce. But, you know, I had to have my sriracha!
Oh, and this makes a pretty big loaf. It can easily be halved if needed.
Thai Turkey Meatloaf
Total Recipe cost: $7.83
Servings Per Recipe: 8
Cost per serving: $0.98
Prep time: 20 min. Cook time: 60-75 min. Total: 1 hr. 35 min.
| LOAF INGREDIENTS | COST | |
| 2 lbs. | ground turkey | $5.36 |
| 4 cloves | garlic | $0.32 |
| 3-4 whole | green onions | $0.38 |
| 2 inches | fresh ginger | $0.30 |
| 3 Tbsp | soy sauce | $0.18 |
| 1 tsp | toasted sesame oil | $0.19 |
| 2 large | eggs | $0.46 |
| 1.5 cups | cooked jasmine rice | $0.26 |
| GLAZE INGREDIENTS | COST | |
| 1/2 cup | brown sugar | $0.12 |
| 2 Tbsp | ketchup | $0.05 |
| 2 Tbsp | sriracha sauce | $0.17 |
| 1 Tbsp | rice vinegar | $0.04 |
| TOTAL | $7.83 | |
STEP 1: Place the ground turkey in a large bowl. Slice the green onions and mince the garlic. Add the onion and garlic to the bowl along with the soy sauce and sesame oil. Peel the ginger and grate it directly into the bowl using a fine cheese grater. Mix everything together well.
STEP 2: Add the eggs and cooked jasmine rice (white rice will work in a pinch). Mix everything together thoroughly. Line a baking sheet with foil and spray with non-stick spray. Place the meat mixture onto the baking sheet and shape it into a loaf.
STEP 3: Preheat the oven to 375 degrees. Once preheated, place the loaf inside and bake for 30 minutes. While the loaf is baking, mix together the sriracha glaze. In a small bowl stir together the brown sugar, ketchup, sriracha, and rice vinegar.
STEP 4: After it has baked 30 minutes, remove the loaf from the oven and spoon half of the sriracha glaze over top. Bake for an additional 30 minutes. Spoon the remaining glaze over top and bake for a final 15 minutes. A meat thermometer placed in the center of the loaf should read 160 degrees Fahrenheit.
STEP 5: Allow the loaf to rest for ten minutes before slicing.
Step By Step Photos
This is the ground turkey that I used. It is 85% lean, 15% fat. The store did have a leaner ground turkey but it was about a dollar more per pound and I figured the fat would help keep the loaf moist. If you prefer the leaner turkey, it should also work just fine.
Place the ground turkey in a bowl and add the sliced green onions, minced garlic, peeled and grated ginger, soy sauce, and sesame oil. Mix it all up very well.
Next add two eggs and the cooked jasmine rice. White or brown rice will work in a pinch if you don't have jasmine rice, but just know that jasmine rice does add some flavor. Mix everything up really well again.
And this is your final Thai turkey mix. You can make it into burgers or meatballs at this point if you don't want a loaf. It's pretty wet and sticky, so if you're making burgers, make sure to use some oil or non-stick spray.
If you're going the meatloaf route, cover a baking sheet with foil and then spray with non-stick spray. Shape the mixture into a loaf. I prefer to bake meatloaf on a baking sheet rather than a loaf pan because it allows extra moisture to drain away. Loaf pans hold it all in and they often get soupy on the bottom.
Bake the loaf in a 375 degree oven for 30 minutes. This is what it looks like so far. Not so pretty, but you can see how some of that moisture is draining away.
While the loaf is baking during that first 30 minutes, mix up the sriracha glaze. Stir together the brown sugar, ketchup, sriracha, and rice vinegar.
Spoon about half of the glaze over the meat loaf and spread it all over the sides. Bake for an additional 30 minutes.
After a full 60 minutes of baking, my meatloaf had already exceeded the safety mark of 160 degrees internal temperature. I still had some glaze left so I spooned it over top and baked it for 15 more minutes.
And then it had a nice thick, sticky sriracha glaze! ...smells SO good. The meatloaf should lift easily from the baking sheet. The glaze that dripped onto the baking sheet was burned, but none of the meatloaf or glaze on the meatloaf were even close to being burned.
I garnished with a few more sliced green onions and I just happened to have some fresh pineapple that I cut up that morning.
Make sure to allow the meatloaf to rest for at least ten minutes before slicing. This allows the steam pressure to reduce, which keeps the moisture in the loaf instead of driving it out.
chorizo breakfast nachos $7.05 recipe / $1.76 serving
To contact us Click HERE
chorizo breakfast nachos
I had an extremely busy week so I pulled some chorizo out of my freezer that I had left over from another recipe and whipped up these super quick breakfast nachos for brinner. ...because I love breakfast, especially for dinner!
I love cooking with chorizo because it's so highly seasoned that you don't even have to add anything else. Add it to soups, stews, burgers, or burritos and it bring all of the flavor to the table that you'll need.
I decided to make my own baked tortilla chips for this because I had some corn tortillas in the fridge, but you could certainly use store bought. Baked chips definitely have a drier texture, so keep that in mind when decided whether to bake your own or buy some. Another alternative (and probably even less expensive) is to pile all of the toppings onto a bowl of grits. YUM!
In the step by step photos I've included some tips on making scrambled eggs... because there's nothing more tragic than dry, over cooked, flakey "scrambled" eggs.

Total Recipe cost: $7.05
Servings Per Recipe: 4
Cost per serving: $1.76
Prep time: 10 min. Cook time: 20 min. Total: 30 min.
STEP 1: Preheat the oven to 400 degrees. Cover a baking sheet with foil and spray with non-stick spray. Using a pizza cutter, slice the tortillas into wedges. Spread them out in a single layer on the baking sheet, trying not to let them overlap. Spray the tops with non-stick spray, bake for ten minutes, stir, and bake again until lightly golden brown (another 5-10 minutes, watch them carefully). Allow the chips to cool.
STEP 2: Squeeze the chorizo from its casing into a skillet. Cook the chorizo over medium heat until it is cooked through. Break the chorizo up as it cooks so that it has a crumbled texture. Allow it to drain on a paper towel covered plate.
STEP 3: Heat 1 tablespoon of butter in a skillet over medium (or just below medium) heat. In a medium bowl, whisk together four large eggs along with 2 tablespoons of water. Once the skillet is heated and the butter has melted, pour in the eggs. Cook the eggs just until lightly set (see tips in the step by step photos).
STEP 4: Arrange the chips on one large platter or four individual plates. Top with the cooked chorizo, eggs, cheese, salsa, and sliced green onions. Serve warm!
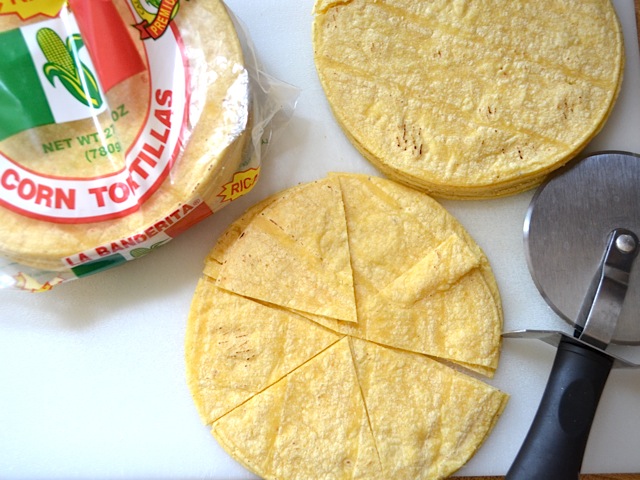
If you're making your own chips, start by preheating the oven to 400 degrees. Cut the tortillas into wedges. I find that cutting them into six pieces makes appropriate sized chips.
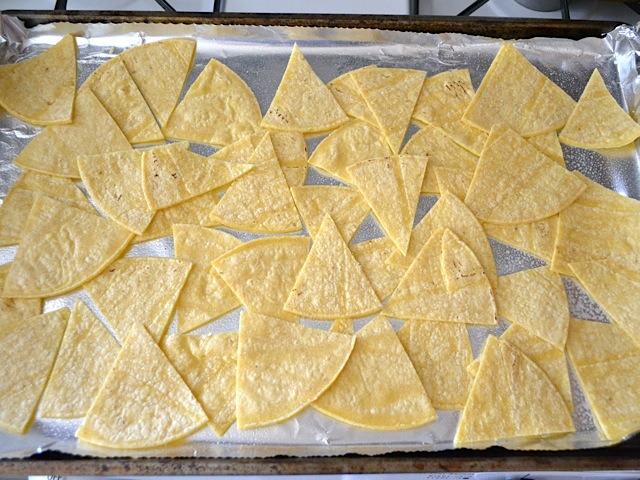
Spread the tortilla wedges out onto a baking sheet covered with foil and coated with non-stick spray. Try not to let them overlap much because they'll stick together.
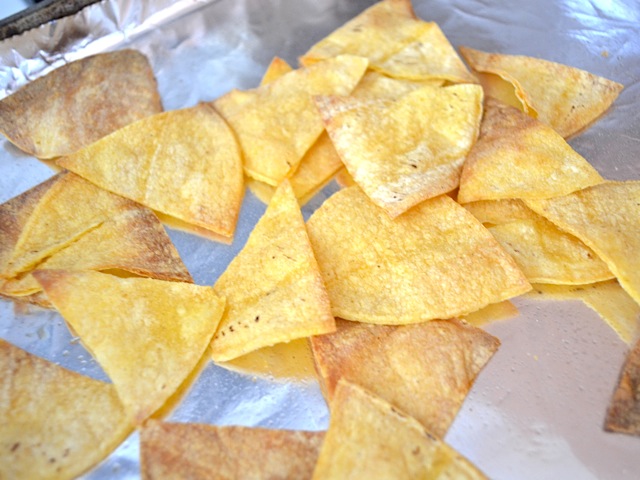
Bake the chips for about 10 minutes, give them a stir, and then bake some more until lightly golden brown (about 5-10 minutes more). Watch them closely, because as you can see in the photo, they start to burn quickly once they're dried out. I've made them a hundred times without burning them, but you know, since I had the camera out this one time... they burned. Oops.
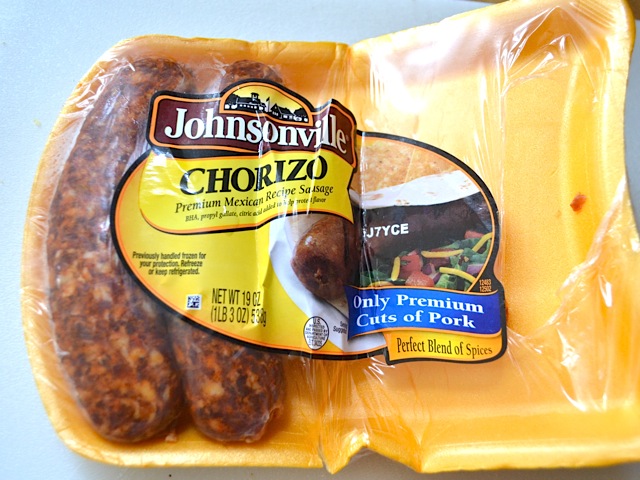
This is the chorizo that I used. It's a national brand and can be found in most grocery stores. It comes in a 19 oz. package (5 links) and I rarely use all of that for one recipe. So last time, I took out 2.5 links, put the rest in a freezer bag and kept it frozen until now. I let it thaw in my refrigerator over night.
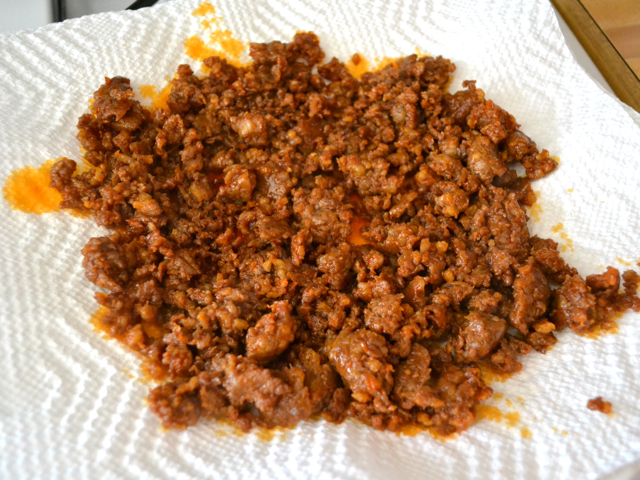
Cook the chorizo in a skillet, breaking it up into crumbles as you go. Chorizo tends to be kind of greasy, so I let it drain on a paper towel covered plate when it was done.
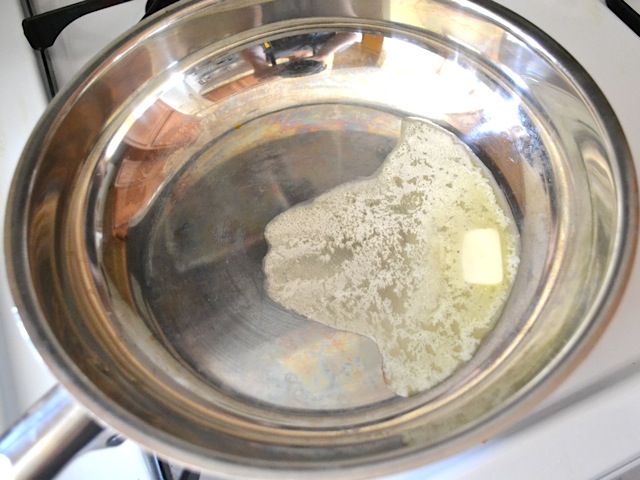
Now for the eggs! Eggs are just better in butter. It's a universal law. So, melt one tablespoon of butter over medium to medium-low heat. I shoot for just below the medium mark on my dial.
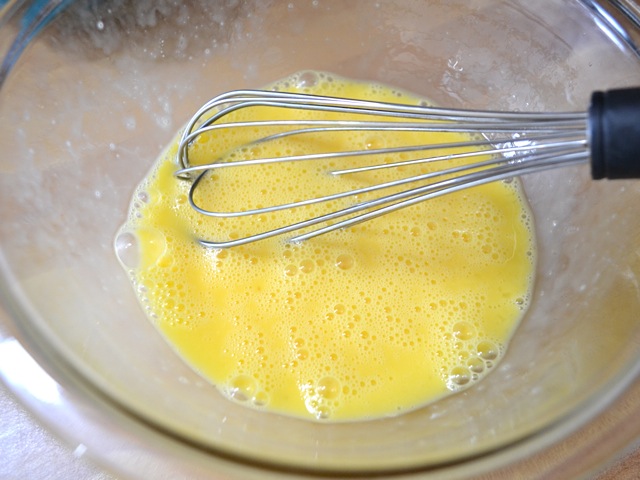
Whisk the eggs together in a bowl along with a couple tablespoons of water. The water helps break up the egg clumps and also produces steam while they cook, making them a little bit fluffier.
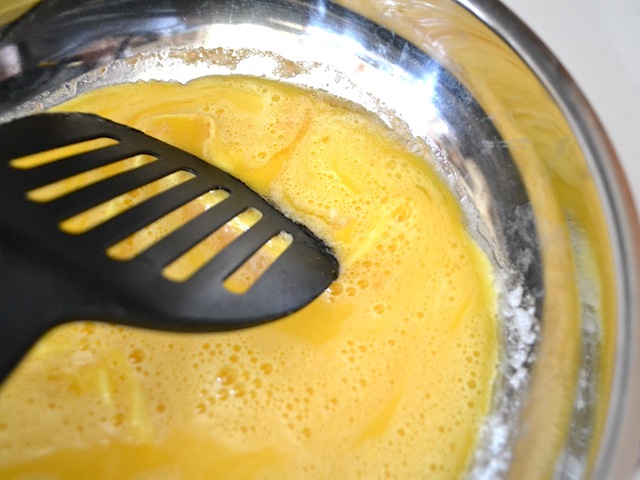
Pour the eggs into the skillet with the melted butter. When the edges begin to set, use a spatula to pull it in towards the center, allowing the uncooked egg to run back into it's place.
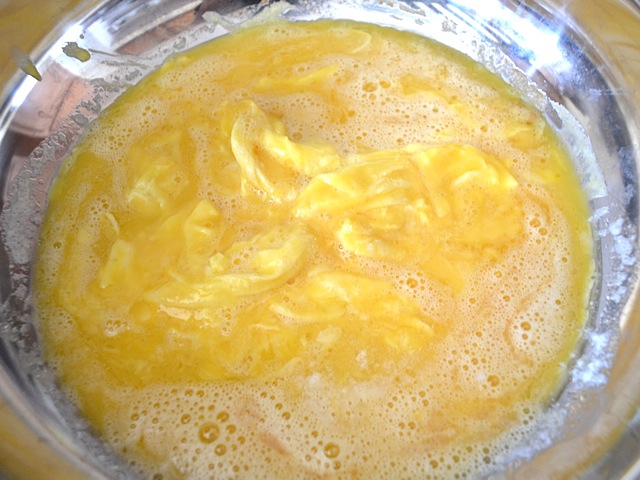
Keep repeating this process, allowing the edges to set before you touch them again. One of the biggest mistakes people make with scrambled eggs is stirring them too much. Just pulling them in towards the center creates gentle folds of egg instead of little bits of broken up cooked egg.
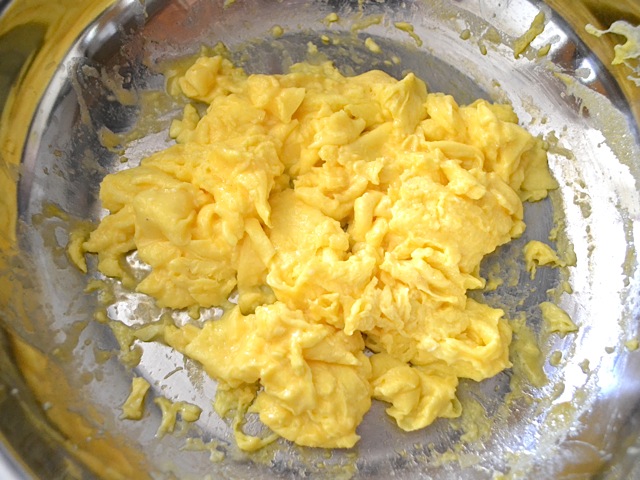
The other mistake that is commonly made is overcooking the eggs. You want to stop when the eggs have just become solid. The surface should still be glossy, not dry. Don't be afraid of a little gooey-ness because the egg will continue to set from residual heat after you turn off the heat. These eggs are soft, moist, and quite perfect if I do say so myself!

Build your nachos in one big platter and let people dig in or build individual plates. I like chips on the bottom, then chorizo, eggs, cheese, salsa, and sliced green onions. I had a little bit of cilantro in the fridge so I garnished with that for the photo, but it's not necessary.
This recipe makes a great, hearty breakfast, brunch, or brinner!
I was SOOO hungry and SOOO tired the night that I made these that I didn't even have the patience to take good pictures. I snapped a couple and then devoured those nachos! But you don't blame me, right? Didn't think so. ;)
chorizo breakfast nachos $7.05 recipe / $1.76 serving
I had an extremely busy week so I pulled some chorizo out of my freezer that I had left over from another recipe and whipped up these super quick breakfast nachos for brinner. ...because I love breakfast, especially for dinner!I love cooking with chorizo because it's so highly seasoned that you don't even have to add anything else. Add it to soups, stews, burgers, or burritos and it bring all of the flavor to the table that you'll need.
I decided to make my own baked tortilla chips for this because I had some corn tortillas in the fridge, but you could certainly use store bought. Baked chips definitely have a drier texture, so keep that in mind when decided whether to bake your own or buy some. Another alternative (and probably even less expensive) is to pile all of the toppings onto a bowl of grits. YUM!
In the step by step photos I've included some tips on making scrambled eggs... because there's nothing more tragic than dry, over cooked, flakey "scrambled" eggs.
Chorizo Breakfast Nachos
Total Recipe cost: $7.05
Servings Per Recipe: 4
Cost per serving: $1.76
Prep time: 10 min. Cook time: 20 min. Total: 30 min.
| INGREDIENTS | COST | |
| 12 | 6-inch corn tortillas | $0.77 |
| 8-10 oz. | mexican chorizo | $2.75 |
| 4 large | eggs | $1.00 |
| 1 Tbsp | butter | $0.10 |
| 1 cup | shredded cheese | $1.25 |
| 2 whole | green onions | $0.19 |
| 1 cup | salsa | $0.99 |
| TOTAL | $7.05 | |
STEP 1: Preheat the oven to 400 degrees. Cover a baking sheet with foil and spray with non-stick spray. Using a pizza cutter, slice the tortillas into wedges. Spread them out in a single layer on the baking sheet, trying not to let them overlap. Spray the tops with non-stick spray, bake for ten minutes, stir, and bake again until lightly golden brown (another 5-10 minutes, watch them carefully). Allow the chips to cool.
STEP 2: Squeeze the chorizo from its casing into a skillet. Cook the chorizo over medium heat until it is cooked through. Break the chorizo up as it cooks so that it has a crumbled texture. Allow it to drain on a paper towel covered plate.
STEP 3: Heat 1 tablespoon of butter in a skillet over medium (or just below medium) heat. In a medium bowl, whisk together four large eggs along with 2 tablespoons of water. Once the skillet is heated and the butter has melted, pour in the eggs. Cook the eggs just until lightly set (see tips in the step by step photos).
STEP 4: Arrange the chips on one large platter or four individual plates. Top with the cooked chorizo, eggs, cheese, salsa, and sliced green onions. Serve warm!
Step By Step Photos
If you're making your own chips, start by preheating the oven to 400 degrees. Cut the tortillas into wedges. I find that cutting them into six pieces makes appropriate sized chips.
Spread the tortilla wedges out onto a baking sheet covered with foil and coated with non-stick spray. Try not to let them overlap much because they'll stick together.
Bake the chips for about 10 minutes, give them a stir, and then bake some more until lightly golden brown (about 5-10 minutes more). Watch them closely, because as you can see in the photo, they start to burn quickly once they're dried out. I've made them a hundred times without burning them, but you know, since I had the camera out this one time... they burned. Oops.
This is the chorizo that I used. It's a national brand and can be found in most grocery stores. It comes in a 19 oz. package (5 links) and I rarely use all of that for one recipe. So last time, I took out 2.5 links, put the rest in a freezer bag and kept it frozen until now. I let it thaw in my refrigerator over night.
Cook the chorizo in a skillet, breaking it up into crumbles as you go. Chorizo tends to be kind of greasy, so I let it drain on a paper towel covered plate when it was done.
Now for the eggs! Eggs are just better in butter. It's a universal law. So, melt one tablespoon of butter over medium to medium-low heat. I shoot for just below the medium mark on my dial.
Whisk the eggs together in a bowl along with a couple tablespoons of water. The water helps break up the egg clumps and also produces steam while they cook, making them a little bit fluffier.
Pour the eggs into the skillet with the melted butter. When the edges begin to set, use a spatula to pull it in towards the center, allowing the uncooked egg to run back into it's place.
Keep repeating this process, allowing the edges to set before you touch them again. One of the biggest mistakes people make with scrambled eggs is stirring them too much. Just pulling them in towards the center creates gentle folds of egg instead of little bits of broken up cooked egg.
The other mistake that is commonly made is overcooking the eggs. You want to stop when the eggs have just become solid. The surface should still be glossy, not dry. Don't be afraid of a little gooey-ness because the egg will continue to set from residual heat after you turn off the heat. These eggs are soft, moist, and quite perfect if I do say so myself!
Build your nachos in one big platter and let people dig in or build individual plates. I like chips on the bottom, then chorizo, eggs, cheese, salsa, and sliced green onions. I had a little bit of cilantro in the fridge so I garnished with that for the photo, but it's not necessary.
This recipe makes a great, hearty breakfast, brunch, or brinner!
I was SOOO hungry and SOOO tired the night that I made these that I didn't even have the patience to take good pictures. I snapped a couple and then devoured those nachos! But you don't blame me, right? Didn't think so. ;)
Kaydol:
Kayıtlar (Atom)