After Amy was born (third-born) I was desperate to get out of the house and do something fun. Tom was extremely sweet and signed me up for a series of 13 cooking classes. One of these classes focused on a recipe for orange chicken. It was fine, but I tried it with a turkey and it was 10x better.
So, first off, forget everything you think you know about preparing a turkey. Wash it alllll away.
And keep in mind that this will seem like more work than it is... kind of like trying to explain how to tie a shoe. There are more words to describe it than movements to it! hehe
Good.
When choosing your turkey, do everything you can to find one that is fresh, never frozen. The texture and taste of fresh turkeys are so much better than frozen.
It is best to not cook a bird that weighs more than 12-13 pounds. If you have a large family and need more turkey, then consider cooking two. It is a pain, but once turkeys get too big they tend to bake unevenly and dry out considerably. Anyway, not a hard and fast rule, but worth considering if you have the time and space.
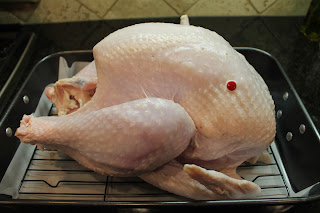
Before you begin to prepare the turkey for baking, take it out of the refrigerator, and set on the counter for at least 30 minutes. You need to bring it as close to room temperature as possible. This will help it to cook evenly and keep it moist.
Get out your roasting pan (doesn't have to be huge) and line it with parchment paper. Only because it will make cleaning up the pan a breeze.


While you are waiting for it to warm up, get out your ingriedients:

Extra Virgin Olive Oil
Salt
Pepper
Thyme
Rosemary
Oranges
Yellow onion
Slice the oranges into fourth wedges per orange. Onions should be halved, and then cut into four wedges each half.

Rosemary and Thyme (as well as other dried herbs) should *always* be ground before seasoning your dish. Grounding herbs releases oils which makes your dishes that much more aromatic and tasty! I use a mortar pestle, because it's awesome! But you can also just roll the herbs between your fingers to release the oils.

Wash the bird. And DRY it with paper towels. I had always heard this, but thought it was goofy, so I never dried it. Turns out, if you don't dry it, it won't brown correctly. And half the battle of a turkey is a great, golden color!
Hold the bird up so that you can easily season the inside of the turkey. Throw in some salt (don't be stingy--the juices will wash away a lot of the salt), pepper, and the herbs. Then squeeze a couple of orange wedges into the bird, then throw the whole thing into the turkey. Alternate between stuffing onion and orange wedges (squeezing the juice out first...all over the bird, inside and out) into the cavity. Then pour 2-3 tablespoon olive oil into/over the produce. This helps to... actually, I have no idea, but it makes the onions smell amazing when they are baking!

Now for the outside of the turkey:
Pour olive oil over turkey and rub it in.
Salt it well, but don't go crazy. I have used sea salt before, and it doesn't work... much too salty.
Pepper
And then throw the rest of the herb mix all over the turkey, making sure you get under the wings and drumsticks.

Stick it in the oven. All ovens vary, so this is a difficult call. I had to use 350 at my old house. I tried 350 in this oven, but it was too hot. Most likely your oven will need to be anywhere between 325 and 350.

Here's the most important piece of information. DO. NOT. open the oven door. At all. Just "Set it, and forget it!" There is no basting required. In fact, if you try to baste your turkey, you fail!
Why no basting? Two reasons:
1) opening your oven door cools the oven down by 20-30 degrees every time you do it. This means the oven over-compensates to try and get the temperature back up, and this will result in a very dry, unappetizing turkey.
2) After about 15 minutes of being in the oven, the turkey skin will begin to crisp which means it will become a barrier to any liquids poured onto it. So just say no to basting. It does no good. And it's a hassle! We don't need more hassles, do we?
So now the turkey is in the oven and is just sitting there baking away! (Turn on the oven light and watch if you must, but leave it be!) In my experience the cooking time on the turkey package is way off... much too much time.
For my 12 lb turkey it took about 2.5 hours. (None of this all day business anymore! With prep and baking, it takes about 3 to 3.5 hours.) It may take you a few turkeys before you know the perfect time to check on your bird.

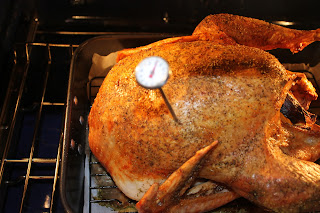
But for this week I would say go for two hours and then check with your meat thermometer. Which reminds me...
That stupid thermometer that comes with the turkey... throw it away. It's useless.

By the time that thing pops, your turkey is way past done. If you don't have a meat thermometer go out today and buy one. They are $5-6 for a cheap one (which is the one I use), but you can get fancy, expensive ones if that makes you feel more confident. Bake your turkey until the thermometer reads 165. Once that temp is reached, remove your turkey from the oven, and allow it to cool for at least an hour. The resting time will allow the juices to stay in the meat once the bird is sliced. (Recently I read that you should allow your meat to rest as long as it took for it to bake/cook. That seems like an awfully long time for things like turkey and pork, but I went with 1.5 hours today.)

Take out the oranges and onions so that it can cool off faster. Discard the produce.

Invest in an electric knife. I love it! It really makes slicing turkey (and chicken) much, much easier.
I have yet to master carving a turkey, but this YouTube helped me figure it out last year.
And that, my friends, will be the best turkey you've ever had.

Happy Thanksgiving!
Hiç yorum yok:
Yorum Gönder